Photo by Markus Spiske on Unsplash
Login form with Firebase and JS
Create login screen with Firebase Authentication in JavaScript
Table of contents
Hi!
In this post I will create login page with Firebase.
Firebase is a platform provided by Google, and can be used to create mobile apps, web apps and even games.
This tool is very useful for Front-end developers because it provides ready to implement back-end services such as authentication and for example real time database.
Form setup
To set up our form we will need HTML login page with inputs.
<div class="login-wrap">
    <h2>Please register,<br> and log in!</h2>
    <label for="email">Please type your e-mail:</label><br>
    <input type="text" placeholder="E-mail" id="email"><br>
    <label for="passwd">Please type your password:</label><br>
    <input type="password" placeholder="Password" id="passwd"><br>
    <input type="submit" value="Login" id="login">
    <input type="submit" value="Register" id="register">
  </div>
Form styles
To make it look better we will use styles below.
.login-wrap{
  position: absolute;
  top: 50%;
  left: 50%;
  transform: translate(-50%, -50%);
  padding: 20px 50px;
  background-color: $primary-color;
  border-radius: 15px;
  box-shadow: 8px 8px 24px 0px rgba(66, 68, 90, 1);

  @media only screen and (max-width: 768px) {
    padding: 20px 20px;
  }
}
.login-wrap h2{
  font-size: 2rem;
  font-weight: 900;
  font-family: Arial;
  color: $text-color-dark;
  margin-bottom: 50px;
}
.login-wrap label{
  font-family: Arial;
  color: $text-color-dark;
}
.login-wrap input[type="text"],
.login-wrap input[type="password"]{
  padding: 10px 20px;
  margin-bottom: 30px;
  margin-top: 10px;
  min-width: 250px;
  border: none;
  border-radius: 25px;

  &:focus{
    outline: none;
  }
}
.login-wrap input[type="submit"]{
  border: none;
  border-radius: 25px;
  padding: 10px 40px;
  margin-bottom: 30px;
  margin-right: 10px;
  font-size: 1rem;
  font-weight: 600;
  font-family: Arial;
  color: $text-color-bright;
  background-color: $text-color-dark;
  cursor: pointer;

  &:hover{
    opacity: 0.8;
  }

  @media only screen and (max-width: 768px) {
    padding: 5px 40px;
    font-size: 0.8rem;
  }
}
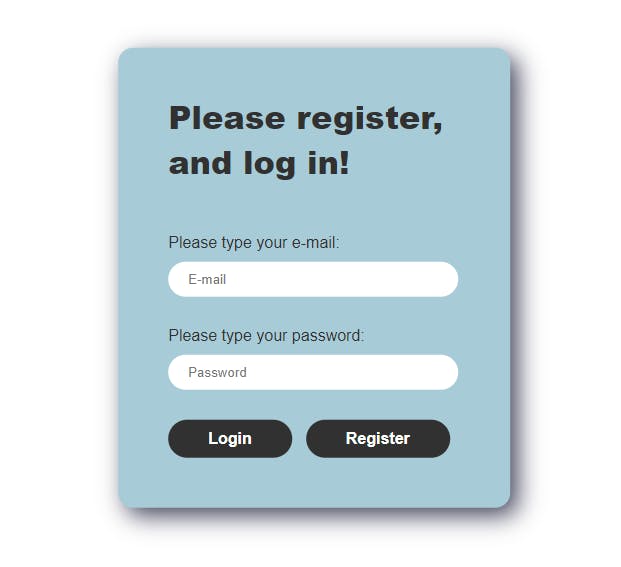
Our form should look like this.
App Init
Next we need to initialize our app.
Firebase will provide us with initialize data that we can use in our JS. I wanted to keep it in separate file.
import { initializeApp } from "https://www.gstatic.com/firebasejs/9.8.3/firebase-app.js"

const firebaseApp = initializeApp({
  apiKey: "************************",
  authDomain: "************************",
  projectId: "************************",
  storageBucket: "************************",
  messagingSenderId: "************************",
  appId: "************************"
})

export {firebaseApp}
Register new user
Next we need to enable sign in methods in our Firebase console. I will use email and password, but there is more methods as for example Google or Facebook.
Now I can create file for signup - auth_signup.js
It is important to add to your script tag type module.
<script type="module" src="./js/auth_signup.js"></script>
As for imports we will need to import firebaseApp from file that we created earlier. We will also need few methods from firebase-auth library and from firebase-database, because I want to create new user in my database to save user data later.
Next I initialize authentication and database. Our trigger to register new user will be register button, that we can create event listener on it.
Method createUserWithEmailAndPassword will do everything for us, you can find explantation how it works in the documentatation here Authenticate with Firebase
One difference is that I also create new user in my database when user is successfully registered. For this I use set method with reference to my database. Here I just create new user with uid generated by Firebase and save user e-mail.
It is also good to catch errors, this will help us with form validation. For example if user will type something else than e-mail adress firebase will let us know. So we can just display it as an alert to the user.
import { firebaseApp } from "./app_init.js"
import { getAuth, createUserWithEmailAndPassword  } from "https://www.gstatic.com/firebasejs/9.8.3/firebase-auth.js"
import { getDatabase, ref, set } from "https://www.gstatic.com/firebasejs/9.8.3/firebase-database.js"

const auth = getAuth(firebaseApp)
const db = getDatabase(firebaseApp)

var signUp = document.getElementById('register')

signUp.addEventListener('click', () => {

  let email = document.getElementById('email').value
  let password = document.getElementById('passwd').value

  createUserWithEmailAndPassword(auth, email, password)
  .then((userCredential) => {
    const user = userCredential.user
    set(ref(db, 'users/' + user.uid), {
      email: email
    })
    alert("User created! Now please log in.")
  })
  .catch((error) => {
    const errorCode = error.code
    const errorMessage = error.message
    alert(errorMessage)
  })
})
Login user
After user is created we can focus on login. We can create file for login - auth_login.js to keep everything organized.
Same as with sign up, here we need to import our Firebase init and then we only need firebase-auth as here we will not save anything to Firebase database.
Next we add event listener to our login button, and when user clicks we call signInWithEmailAndPassword method provided by Firebase. More about this metod here Authenticate with Firebase
If user is successfully logged we can redirect user to our application.
If we have any errors, for example user entered email that is not registered in our Firebase, we can catch this error end again display it to the user.
import { firebaseApp } from "./app_init.js"
import { getAuth, signInWithEmailAndPassword } from "https://www.gstatic.com/firebasejs/9.8.3/firebase-auth.js"

const auth = getAuth(firebaseApp)

var login = document.getElementById('login')

login.addEventListener('click', () => {

  let email = document.getElementById('email').value
  let password = document.getElementById('passwd').value

  signInWithEmailAndPassword(auth, email, password)
  .then((userCredential) => {
    const user = userCredential.user
    window.location.href="app.html"
  })
  .catch((error) => {
    const errorCode = error.code
    const errorMessage = error.message
    alert(errorMessage)
  });
})
If you find any mistakes or you have ideas how to refactor my solutions to be simpler/ better please let me know :)


